Hyrox sled push guide: Mastering the challenge
Master the HYROX sled push with expert tips on form, strength, and technique. Boost performance and endurance with our complete guide.


Master the HYROX sled push with expert tips on form, strength, and technique. Boost performance and endurance with our complete guide.
If you have signed up for a HYROX race or have merely heard about it without a doubt you are aware of the infamous sled push.
One of the eight stations you must complete at the race the sled push comes with many challenges and as many rewards to those who learn how to master it.
The sled push is the second station you go up against in a HYROX race sandwiched in between the sled pull and the burpee broad jumps. The weight will change based on division but the described distance to be covered is always 50 m.
HYROX rookie, Crossfitter turned HYROX racer or seasoned pro. No matter who you are, you can all benefit from better understanding the technicalities behind the sled push.
From different techniques to tips for race day and drills to practice in training, we share some of our most valuable knowledge on the matter in this blog post.
The sled push is the second station in a HYROX race, and it’s what truly sets the tone for the rest of your competition. It can literally make you or break you, especially if you exert yourself out too much too soon by committing strategy mistakes or showing up under prepared.
In terms of WHAT the sled push station looks like it’s quite simple: you must push a 30 kg sled across a carpeted floor for 50 m. On top of the sled weight will be piled to reach the given standard for your selected division.

The sled push can be essentially split in two: the starting step and the walking.
The first step will look different from the rest of the push as it requires more force to get a still object in movement than what is necessary to keep it moving.
We break down both of these parts in their dedicated section.
An often overlooked standard for the sled push is the flooring.
The surface over which you are moving the sled can drastically change what any given weight feels like, so it’s crucial to understand if the flooring in your training area is comparable to that of the HYROX standard, harder or easier.
Women: 102 kg incl. sled
Women Pro: 152 kg incl. sled
Men: 152 kg incl. sled
Men Pro: 202 kg incl. sled
Mixed Doubles: 152 kg incl. sled
Women Doubles: 102 kg incl. sled
Men Doubles: 152 kg incl. sled
Relay: 102 kg /152 kg (F/M) incl. sled
As previously stated, the sled push is the second station in the race. You will reach it still relatively fresh, but there are high chances of leaving it feeling wrecked.
If not paced well, or prepared well, it can compromise your whole race as it is perhaps the heaviest challenge your legs will have to face across all stations.
So prepare it well, or prepare to fail.
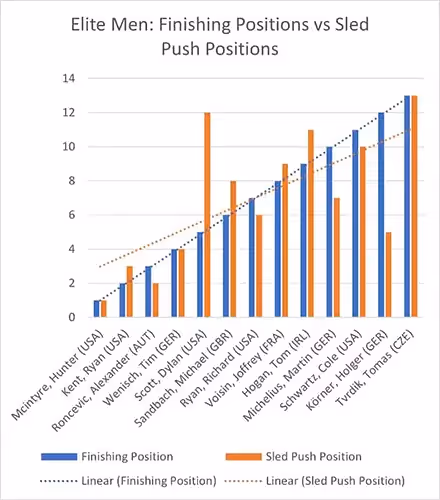
To exemplify how crucial the sled push is to HYROX racing and performance we’ve found these sample graphs (reach out to be credited) that visually showcase a quite evident positive correlation between performance on the sled push and overall placement.

You will be required to complete the push in 4 repeats of 12.5 meters.
As soon as the athlete completes the last section and the entire sled passes the start/finish line, the station is completed.
If not all 50 meters are cleared within the allotted time for that station, a penalty of 3 minutes per missing section will be awarded.

The push off: as we’ve previously mentioned perhaps the hardest part of the sled push is getting the sled to start moving in the first place. No matter your chosen technique, we always recommend a two-foot push off.
You will want to maximize your weight through momentum, so plant your feet steadily and then let yourself “fall forward” against the sled.
Couple that first bout of momentum with a strong push from both legs once you’ve made contact with the sled. Once your body is fully extended against the sled, start with your strides.
THE TECHNIQUES
There are three commonly used variations of the sled push that you should know about and train to find the perfect fit for you.
We’d argue this is the variation most favored by rookies and especially men. Hands are usually place in the upper third of the sled poles. You will be pushing the sled from a “front rack” position where you arms are fully bent and your shoulders are one the same plane of your hands and the sled poles BUT are NOT making contact with either.

This variation is very taxing on the shoulders so depending on your height, levers and strength biases may not be the best variation of the three.
However it does have its place among the options to train especially for men as they do have more relative height to the sled as well as upper body strength.
Great option if you are on the shorter side, want to save your upper body “juice” for later on in the race pr just don’t have the shoulder strength yet to maintain that front rack hold while pushing the sled.
We call it full lock out as you will have your arms fully extended, elbow possibly locked out if you are comfortable with it, and we also recommend pushing some extension in your upper back to create a more stacked position that will tire you out less as you move the sled.
Hands should go in the middle section of the sled poles to avoid creating odd angles of force that might make it feel heavier.

When completing the first step of the sled push and utilizing the full lockout technique, make sure to immediately start with your arms already locked out as pressing the sled with your arms will tire them out for nothing.
You might have seen this technique used by pro athletes, especially men who weigh enough to use their body “against” the sled.
The athlete will place their hands towards the end of the sled poles, fingers facing down, and then “wrap their arms” around the poles, letting their shoulders physically rest against the top of the poles.

This technique can be “passive”, allowing the upper body to rest.
Or more “active” with the athlete almost actively pulling onto the sled poles in order to pull up his side of the sled and take away some of the weight-bearing down on the floor.
This second version can become quite taxing, but when your goal isn’t to just get through the station anymore but to become as fast as possible on it then it does truly help locking in more speed.
Besides the necessity to train sled pushes if you wish to compete in HYROX this movement is a great way to develop lower body strength without excessively taxing your joints.
This is thanks to the removal of the eccentric phase which can be the most stressful for knees, hips and ankles.
Depending on variation chosen, you will be able to focus on quad development or more classic “posterior chain” (think glutes and hamstrings). Because of these reasons, it’s also a great implement in any return-to-training rehab process post injury.
If you’re a CrossFitter thinking about doing a HYROX race and wondering if any of this training will have some carry over to your CrossFit or how you can utilize some of these movements in your more regular training the sled push is a great tool.
With so many joint-taxing movements, this skill offers a way to continue building lower body strength, explosiveness, hypertrophy and lactate threshold without adding more strain to your knees, hips and ankles.
The sled push is one of those movements that doesn’t require too much priming before you hit it.
However, you may want to give some attention to knees, hips and ankles before starting your session. If you are going to perform a workout with a strong focus on the sled push we recommend a warm-up structured as follows:
There are no magic drills here to boost performance.
The sled push is not a highly technical movement meaning there is no room to hide if you are not the strongest on the field. HOWEVER, if you are selecting the wrong technique for you, then you will definitely see a decrease in overall potential performance.
So instead of looking for quick tips to improve your time, focus on finding the right sled push variation that works for your needs.
Practice up to competition standards in terms of distance, flooring and weight. And if you are struggling against the assigned weight for your division, commit to doing more strength and hypertrophy work for your quads and posterior chain.

One tip we do however want to give is to play around not just with technique but also your stride distance. You may find you have a personal preference for how long you take your steps and therefore your step frequency/speed of steps. And you may also find that depending on the variation you test you will have a different preference.
The good news is that the sled push is the second station you will head up against in a HYROX race, so you will still be relatively fresh.
The bad news?
You probably won’t be feeling so fresh once you are done with it.

Like with any other movement prescribed in the stations, it’s important that you train under fatigue and practice running compromised before and after it. This will also help tremendously with being prepared mentally for how trashed you will be feeling.
Don’t forget! You will be pushing hard on race day, especially at the start where you’ll be running on an adrenaline high. So you need to be ready to find yourself more fatigued than you’re used to on the sled push. But don’t let that stop you; if you’re mentally prepared and stay focused you’ll crush that station regardless.
As we’ve explained, getting the sled in motion is the most energy intensive part of the sled push.
So if you stop too often, it means you will also have to expend a lot more energy to restart the push each time.
The goal should be to stop only once you’ve crossed the finish line for each of your four 12.5 m segments.
If you don’t have the strength for that yet, pre-plan how many breaks you will take and STICK TO IT!
We get it, it’s the second station, the race high is hitting, adrenaline is flowing in your veins and you want to crush the sled push and move onto the next run.
But if you find yourself blasting through the first section much faster than you would in training you must see this as a red flag.
You may not feel it immediately, but that fatigue and lactate will come to get you either in the later sections, on the run or on the next station.
So remember it’s good to be aggressive but stick to a plan especially so early in the race.
Look this can happen to anyone and fretting over it will only raise your heart rate for nothing.
Keep on trudging on and if the curve in the carpeting has formed towards the end of your section you can likely complete it without many issues.
If it forms earlier on and you are planning to take a quick break across the 12.5 meters you may attempt to straighten out the carpet just don’t waste excessive time on it.

A few common substitutions are: treadmill pushes (treadmill is turned off, and you push against the handle bar), steep uphill sprinting, stationary pushes against wall, plyo box pushes on smoother flooring. These all mimic parts of the sled push movement, however we encourage planning on finding a gym where you can practice the sled push at least once before your race.
If you have previous racing experience, of course, base yourself off that and how you felt when pushing the sled on the second station at your race. If you’re a rookie racer but know someone who’s done a race, you may ask them if what you are practicing with feels comparable to what they had to do on race day (personal differences need to be accounted for but this will give you a better understanding of how the flooring you’re practicing interacts with the sled compared to the one at a HYROX race). And don’t forget: when in doubt you can always go heavier.
John Singleton, the founder of The Progrm, is known for training elite athletes, including many of Europe’s top CrossFit Games competitors. With a Master’s degree in Osteopathy, John combines science-based programming with a focus on performance and recovery. Based in Mallorca, Spain, he leads a global community dedicated to helping athletes optimize performance and longevity in the sport.

.avif)