Guide: The Pistol Squat
Pistol squats can be a challenging skill even to the most experienced athletes. Learn what is holding you back from mastering them with our guide.


Pistol squats can be a challenging skill even to the most experienced athletes. Learn what is holding you back from mastering them with our guide.
This gymnastics exercise can be frustrating for some CrossFit athletes because for many, the mobility demand outweighs the strength demand.
If you don’t have pistols in your arsenal, read below to see how you can develop this crucial CrossFit skill. (If you suspect that your mobility is the problem, click here to check out some ways you can improve your ankle mobility!)
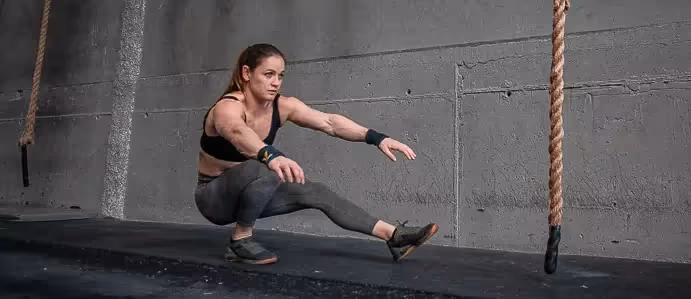
Pistol squats, also known as single leg squats, have long been a bodyweight staple of CrossFit workouts. The athlete must perform a squat that breaks parallel while supporting themselves only on one leg. The high demand of strength, balance, mobility, and coordination is what makes this exercise so advanced.
Incorporating pistol squats in your training will help to develop your quads, hamstrings, glutes, calves, core, and hip flexors. Pistols help improve muscle recruitment, flexibility, mobility and proprioception. Being a body weight exercise, it's relatively low impact and when performed properly, can potentially help to strengthen your joints.
For a more in-depth overview on how to perform this exercise, see our video below. Don't forget to follow us and subscribe to our channel on YouTube for more tutorials like this one:
People may struggle to perform pistol squats due to a lack of mobility, balance, and/or strength. However, we found working with hundreds of athletes that more often than not it's a lack of mobility that is the issue NOT strength.
Here are some common reasons why some individuals find pistol squats so challenging:
Lack of hip and ankle mobility to maintain balance and achieve proper depth.
Insufficient strength in the quadriceps help to maintain balance and control throughout the exercise, but especially in core which is needed to stabilize the body and keep it upright during the movement.
It's worth noting that pistol squats are an advanced bodyweight exercise, and not everyone may be able to perform them immediately. However, with consistent practice, mobility work, and strength training focused on the relevant muscle groups, almost anyone can work towards achieving pistol squats over time.
You can work your way up to your first pistols or improve said skill by following our progression below:
NOTE: Pistol squats are a safe exercise however it's not uncommon that you may feel tension or cramping. If cramping occurs in your quads, hamstrings, or glutes, self-massage and rest are enough to solve the issue.
The first progression we're going to start with resembles a traditional air squat except with a few intentional adjustments.
This drill is very similar to a typical reverse lunge however again, we will make some intentional adjustments specific to training pistols and building single leg strength.
Just like in the previous progression, the idea is to gradually close your stance (a short stance) to increase the demand on the working leg. Perform this exercise alternating sides on each rep as you would with reverse lunges or pistol squats.
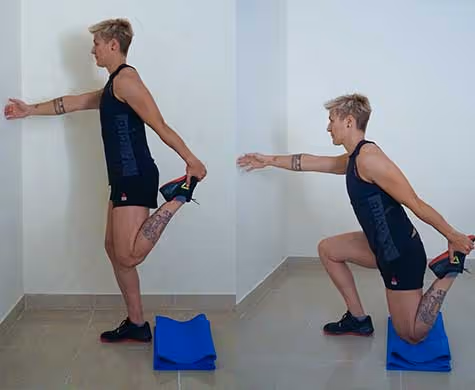
Progress this exercise by incorporating ankle plantiflexion and eventually, a leg lift:
From your short half-kneeling stance, extend the ankle of your back leg before leaning forward and pushing out of the position. The aim is to use the back leg more for support than to actually push out of the bottom position. This will load your front leg more, making it more challenging but also a great way to mimick the pistol squat stimulus.
Ultimately, you will be able to lift the back leg off the ground completely before standing.
Negatives focus on the eccentric part (the lowering phase) of the exercise to help us get stronger and more efficient at controlling the concentric part of the exercise. Additionaly thye get the body used to the strength demand of the deeper range of motion required to complete a proper pistol rep.
Once you're able to control through negatives without any assistance, you can begin to apply tempo training. A good place to start is taking two seconds to lower down and two seconds holding at the bottom before coming up.
From there, you can progress into performing faster and faster pistols for example in workouts. If that doesn't work well, spend more time working on the earlier progressions to get stronger in end ranges and mobilize the joints that are limiting progress.
Even if you're able to do a valid pistol, odds are you could be more efficient. By avoiding a few common errors and using some reinforcing drills, we can make our pistol squats technically sound.
Avoid heel raising - if your heel comes up when you get to the end range of the pistol squat, this could mean that you have restricted hip or ankle mobility. Obviously, the long-term solution is to work on those zones in order to have access to those ranges of motion; however, a short-term fix is to elevate the heel using a small plate or lifting shoes. A thicker plate will provide more “support”, so progressing to thinner plates is the goal in this case.
Get smoother reps - Your hip flexors do a lot of work to keep your non-working leg up as your body gets closer to the floor. If they aren't strong enough you may find yourself flayling around, trying to reach for the resting leg to give it support and just generally wasting time on sloppy reps. Work on holds and contractions to help keep the non-working leg high and in front of your body when you’re at the bottom of the pistol. Mastering this position will help you to cycle through reps more smoothly. And smooth = fast.
Use your feet! - Keeping your arches active will also help you to execute efficient, smooth reps by making it easier to “get out of the hole”. Engaging your feet will lead you to maintain tension in the bottom position and prevent your knees from caving in. Work on it by doing pistols barefoot to develop the balance and stability needed for high volume and speedy sets. Not to mention, without any additional support, practicing this way will make performing pistols in shoes a piece of cake.
Whether you have pistols or not, most athletes can benefit from these drills that target increasing the range of motion and flexibility in the hips and ankles. Many of our athletes always find their second set of pistols in a workout way less challenging because their body has been "primed" by the first round. But by implementing these drills you can forgo the first set of rusty reps and make up time by immediately jumping into smooth and efficient pistols.
Try this routine before you practice the progressions or before a WOD that features pistol squats.
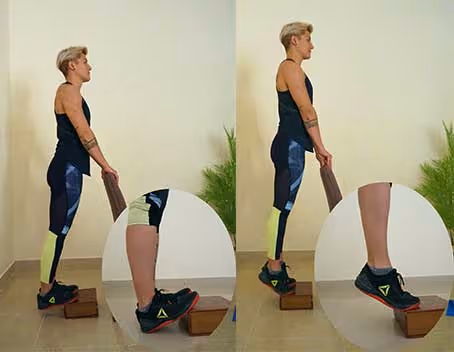
Stand on a 10, 15, or 20 kg plate and use a stable support (like a wall or a rig) to balance yourself. Let your heels hang off of the plate and perform calf raises with a 1 second raising phase and a 3 second descending phase.
Make sure that you end up in a stretch position for the calves.
Complete 2-3 sets of 10-20 reps.
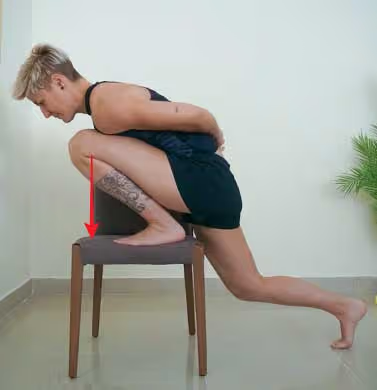
Place the foot on a chair/box, make sure you have the toes pointing forward and that the arch doesn’t collapse. Go to knee flexion making sure that the knee cap tracks the second toe and the heel doesn’t come off of the chair.
Put some pressure at the end of the range of motion by bringing your chest to your knee and pressing down using your weight. Maintain the position for 20 seconds and do the same on the other ankle.
Complete 3 sets of 20-second holds on each side.
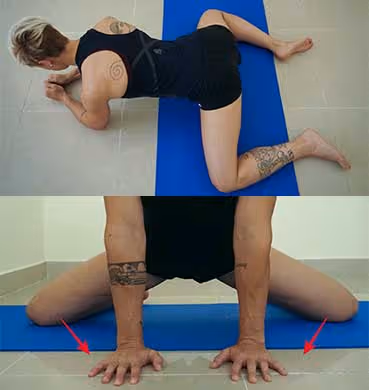
Lay down with the knees out and the hips in external rotation. Hold that position for 10 seconds and go into a PNF stretch (bottom picture) pressing against the floor for 5 seconds. Relax and go deeper into the stretch for 10 seconds.
Accumulate 1 minute.
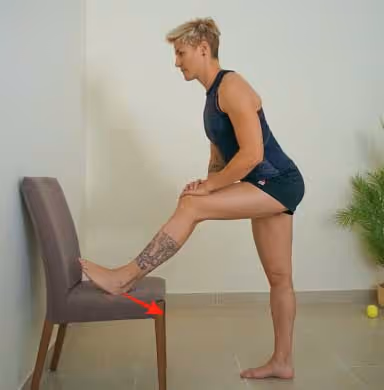
Hamstring stretch:
With the same PNF technique that we used before (5 seconds press and 10 seconds relax) place your foot on a chair while standing. Keeping a neutral spine hinge on the hips and bring the chest forward as you press your foot against the chair.
Accumulate 1 minute.
With these simple exercises done everyday you will feel the difference.
Just because you don't have pistols yet doesn't meant that you should avoid them all together. Substituting pistols with these specific exercises will help develop the strength and skill needed to RX the movement in the future. Try any (or all!) of these the next time you're confronted with pistol squats in your training.
Once you achieve full range of motion, control and tension are the keys to mastering pistol squats. Even if you’re starting from the most basic progression, investing time in intentional practice will guarantee results and put you on the path to success.
John Singleton, the founder of The Progrm, is known for training elite athletes, including many of Europe’s top CrossFit Games competitors. With a Master’s degree in Osteopathy, John combines science-based programming with a focus on performance and recovery. Based in Mallorca, Spain, he leads a global community dedicated to helping athletes optimize performance and longevity in the sport.

.avif)